Set up Cloudflare tunnels with Nginx Proxy Manager
Recently, I learned about Cloudflare tunnels and how you can safely expose your internal services without opening any ports on your router and I was mindblown! In this post, I’ll show how to set up the Cloudflare tunnel, installing Docker services, using a wildcard subdomain to route all requests to NPM (Nginx Proxy Manager), and adding Google authentication to your applications.
Why Cloudflare Tunnels
One of the prerequisites to this tutorial is that you need to add a site to Cloudflare that you can manage. This will include many default features such as DDoS protection, malicious bots, and you can analyze stats for traffic directed to your website. Your domain does not need to be owned by Cloudflare but in my case, it is. If you have a domain elsewhere, the only steps should be to point your domain’s nameservers to Cloudflare’s nameservers but be sure to check their documentation. Lastly, everything in this tutorial is absolutely FREE!
Cloudflare tunnels are wicked because they will update your IP dynamically if it changes, encrypt all traffic, and include the above site protection features for your domain. There is a lot to it so let’s dive in.
Preparing a VM
In my previous post, I documented how to create a VM in Proxmox. I will build off of that to prepare a VM that will install the cloudflared tunnel as well as NPM as a Docker container.
Install Packages
First, we’ll run the following commands to help us out.
conductor@npm:~$ sudo apt update && sudo apt upgrade
conductor@npm:~$ sudo apt install vim openssh-server
Next, let’s check the status of the SSH service to see if it was configured properly.
conductor@npm:~$ systemctl status sshd
● ssh.service - OpenBSD Secure Shell server
     Loaded: loaded (/lib/systemd/system/ssh.service; enabled; vendor preset:
     Active: active (running) since Sat 2023-03-11 13:30:10 EST; 3min 51s ago
       Docs: man:sshd(8)
             man:sshd_config(5)
   Main PID: 3959 (sshd)
      Tasks: 1 (limit: 3484)
     Memory: 2.6M
     CGroup: /system.slice/ssh.service
             └─3959 sshd: /usr/sbin/sshd -D [listener] 0 of 10-100 startups
Configure a static IP
The distribution I’m working with is an Ubuntu 20.04 instance which uses netplan for it’s network management. Netplan configuration files are saved in /etc/netplan and the only file I have is 01-network-manager-all.yaml
conductor@npm:~$ cat /etc/netplan/01-network-manager-all.yaml
# Let NetworkManager manage all devices on this system
network:
  version: 2
  renderer: NetworkManager
To update the configuration file, first, check the name of your interface.
conductor@npm:~$ ip -br a
lo               UNKNOWN        127.0.0.1/8 ::1/128
ens18            UP             192.168.0.X/24 2607:fea8:bddf:bc00::217c/128 2607:fea8:bddf:bc00:18f3:8fff:fee4:ebcd/64 fe80::18f3:8fff:fee4:ebcd/64
Update the configuration file similar to the contents below replacing the interface, IP address(es), the DNS servers, and the route to your gateway.
conductor@npm:~$ cat /etc/netplan/01-network-manager-all.yaml
# Let NetworkManager manage all devices on this system
network:
  version: 2
  ethernets:
    ens18:
      dhcp4: false
      addresses: [192.168.0.X/24]
      nameservers:
        addresses: [8.8.8.8, 8.8.4.4]
      routes:
        - to: default
          via: 192.168.0.1
Apply the netplan and check to see if the IP address was applied.
conductor@npm:~$ sudo netplan apply
conductor@npm:~$ ip -br a
lo               UNKNOWN        127.0.0.1/8 ::1/128
ens18            UP             192.168.0.X/24 2607:fea8:bddf:bc00::217c/128 2607:fea8:bddf:bc00:18f3:8fff:fee4:ebcd/64 fe80::18f3:8fff:fee4:ebcd/64
I usually reboot to see if the IP was persistent on reboot.
Install Docker
Docker Repository Configuration
These instructions are from Docker 1 but I will summarize them here.
Update the apt package index and install packages to allow apt to use a repository over HTTPS:
conductor@npm:~$ sudo apt-get update
conductor@npm:~$ sudo apt-get install ca-certificates curl gnupg lsb-release
Add Docker’s official GPG key.
conductor@npm:~$ sudo mkdir -m 0755 -p /etc/apt/keyrings
conductor@npm:~$ curl -fsSL https://download.docker.com/linux/ubuntu/gpg | sudo gpg --dearmor -o /etc/apt/keyrings/docker.gpg
Set up the repository
conductor@npm:~$ echo "deb [arch=$(dpkg --print-architecture) signed-by=/etc/apt/keyrings/docker.gpg] https://download.docker.com/linux/ubuntu $(lsb_release -cs) stable" | sudo tee /etc/apt/sources.list.d/docker.list > /dev/null
Docker Package Installation
Update the package index with the new repositories that were added.
conductor@npm:~$ sudo apt-get update
Install Docker Engine, containerd, and Docker Compose.
conductor@npm:~$ sudo apt-get install docker-ce docker-ce-cli containerd.io docker-buildx-plugin docker-compose-plugin
Verify that everything is working by pulling the hello-world image which is pretty much a container that Docker maintains to ensure your Docker installation is good to go.
conductor@npm:~$ sudo docker run hello-world
Unable to find image 'hello-world:latest' locally
latest: Pulling from library/hello-world
2db29710123e: Pull complete
Digest: sha256:6e8b6f026e0b9c419ea0fd02d3905dd0952ad1feea67543f525c73a0a790fefb
Status: Downloaded newer image for hello-world:latest

Hello from Docker!
This message shows that your installation appears to be working correctly.

To generate this message, Docker took the following steps:
 1. The Docker client contacted the Docker daemon.
 2. The Docker daemon pulled the "hello-world" image from the Docker Hub.
    (amd64)
 3. The Docker daemon created a new container from that image which runs the
    executable that produces the output you are currently reading.
 4. The Docker daemon streamed that output to the Docker client, which sent it
    to your terminal.

To try something more ambitious, you can run an Ubuntu container with:
 $ docker run -it ubuntu bash

Share images, automate workflows, and more with a free Docker ID:
 https://hub.docker.com/

For more examples and ideas, visit:
 https://docs.docker.com/get-started/
The -a option will show all containers that are not running as well.
conductor@npm:~$ docker ps -a
CONTAINER ID   IMAGE         COMMAND    CREATED          STATUS                      PORTS     NAMES
144cb948ca3a   hello-world   "/hello"   28 seconds ago   Exited (0) 27 seconds ago             relaxed_aryabhata
Clean up the container and image
conductor@npm:~$ docker rm 144cb94
144cb94
conductor@npm:~$ docker image rm hello-world
Untagged: hello-world:latest
Untagged: hello-world@sha256:6e8b6f026e0b9c419ea0fd02d3905dd0952ad1feea67543f525c73a0a790fefb
Deleted: sha256:feb5d9fea6a5e9606aa995e879d862b825965ba48de054caab5ef356dc6b3412
Deleted: sha256:e07ee1baac5fae6a26f30cabfe54a36d3402f96afda318fe0a96cec4ca393359
The docker rm command will accept the first few bytes of the Container ID.
Finishing Up
To wrap up the Docker installation, let’s enable the Docker and containerd service so that these services will start on boot.
conductor@npm:~$ sudo systemctl enable docker.service
conductor@npm:~$ sudo systemctl enable containerd.service
Finally, all that should be left is to be able to manage the Docker installation as a non-root user 2
Create the docker grou and add your user.
conductor@npm:~$ sudo groupadd docker
Add your user to the group.
conductor@npm:~$ sudo usermod -aG docker $USER
Activate the changes to the groups. Otherwise, you’ll have to log out and log back in.
conductor@npm:~$ newgrp docker
Feel free to pull the hello-world image to test if using the docker command without sudo works.
Install Cloudflared
On Cloudflare, enter the section to manage your site. Follow the below steps to create your first tunnel:
- Enter the dashboard to manage your site _> select Access from the lefthand tabs -> Launch Zero Trust -> Expand the Access tab -> Tunnels
- Create a tunnel and provide a name for your tunnel
- Install the connector. During my testing, I tried Docker and although it works, there was one annoying issue with the network namespace for the Docker container so I’m going to use the Debian installer.
- Download the cloudflared debian package and install the service. Execute the three commands below replacing the JWT token with the one Cloudflare provided.
conductor@npm:~$ curl -L --output cloudflared.deb https://github.com/cloudflare/cloudflared/releases/latest/download/cloudflared-linux-amd64.deb &&
conductor@npm:~$ sudo dpkg -i cloudflared.deb &&
conductor@npm:~$ sudo cloudflared service install <JWT token>
Once this command finishes executing, status at the bottom of the page should have a “Connected” status.
Install Nginx Proxy Manager
Now, let’s install Nginx Proxy Manager and use the following docker-compose file to create our Docker container.
version: "3"
services:
  app:
    image: 'jc21/nginx-proxy-manager:latest'
    restart: unless-stopped
    ports:
      # These ports are in format <host-port>:<container-port>
      - '80:80' # Public HTTP Port
      - '443:443' # Public HTTPS Port
      - '81:81' # Admin Web Port
      # Add any other Stream port you want to expose
      # - '21:21' # FTP
    environment:
      DB_MYSQL_HOST: "db"
      DB_MYSQL_PORT: 3306
      DB_MYSQL_USER: "npm"
      DB_MYSQL_PASSWORD: "npm"
      DB_MYSQL_NAME: "npm"
      # Uncomment this if IPv6 is not enabled on your host
      # DISABLE_IPV6: 'true'
    volumes:
      - ./data:/data
      - ./letsencrypt:/etc/letsencrypt
    depends_on:
      - db

  db:
    image: 'jc21/mariadb-aria:latest'
    restart: unless-stopped
    environment:
      MYSQL_ROOT_PASSWORD: 'npm'
      MYSQL_DATABASE: 'npm'
      MYSQL_USER: 'npm'
      MYSQL_PASSWORD: 'npm'
    volumes:
      - ./data/mysql:/var/lib/mysql
The above is a standard file provided from the NPM website so let’s make a few changes. First, we’re going to change up some of the paths for the volumes and use a more secure password.
conductor@npm:~$ sudo mkdir -p /data/docker/{npm,mysql}
conductor@npm:~$ ls -la /data/docker/
total 16
drwxr-xr-x 4 root root 4096 Mar 11 14:42 .
drwxr-xr-x 3 root root 4096 Mar 11 14:42 ..
drwxr-xr-x 2 root root 4096 Mar 11 14:42 mysql
drwxr-xr-x 2 root root 4096 Mar 11 14:42 npm
Our new configuration file.
version: "3"
services:
  app:
    image: 'jc21/nginx-proxy-manager:latest'
    restart: unless-stopped
    ports:
      # These ports are in format <host-port>:<container-port>
      - '80:80' # Public HTTP Port
      - '443:443' # Public HTTPS Port
      - '81:81' # Admin Web Port
      # Add any other Stream port you want to expose
      # - '21:21' # FTP
    environment:
      DB_MYSQL_HOST: "db"
      DB_MYSQL_PORT: 3306
      DB_MYSQL_USER: "npm"
      DB_MYSQL_PASSWORD: "<user password>"
      DB_MYSQL_NAME: "npm"
      # Uncomment this if IPv6 is not enabled on your host
      # DISABLE_IPV6: 'true'
    volumes:
      - /data/docker/npm/data:/data
      - /data/docker/npm/letsencrypt:/etc/letsencrypt
    depends_on:
      - db

  db:
    image: 'jc21/mariadb-aria:latest'
    restart: unless-stopped
    environment:
      MYSQL_ROOT_PASSWORD: "<root password>"
      MYSQL_DATABASE: 'npm'
      MYSQL_USER: 'npm'
      MYSQL_PASSWORD: "<user password>"
    volumes:
      - /data/docker/mysql/mysql:/var/lib/mysql
After saving the above file as docker-compose.yml, run the following
root@npm:/data/docker# docker compose up -d
After a few seconds, the containers should be started and we can verify that with the docker ps command.
conductor@npm:/data/docker$ docker ps
CONTAINER ID   IMAGE                             COMMAND             CREATED              STATUS              PORTS                                                                                  NAMES
9bb1dc81e49c   jc21/nginx-proxy-manager:latest   "/init"             About a minute ago   Up About a minute   0.0.0.0:80-81->80-81/tcp, :::80-81->80-81/tcp, 0.0.0.0:443->443/tcp, :::443->443/tcp   docker-app-1
fe5074aaa88c   jc21/mariadb-aria:latest          "/scripts/run.sh"   About a minute ago   Up About a minute   3306/tcp                                                                               docker-db-1
If we browse to the IP address for the server that we’ve configured on port 81 (NPM admin panel), http://”< IP >”:81, we should see the login form.
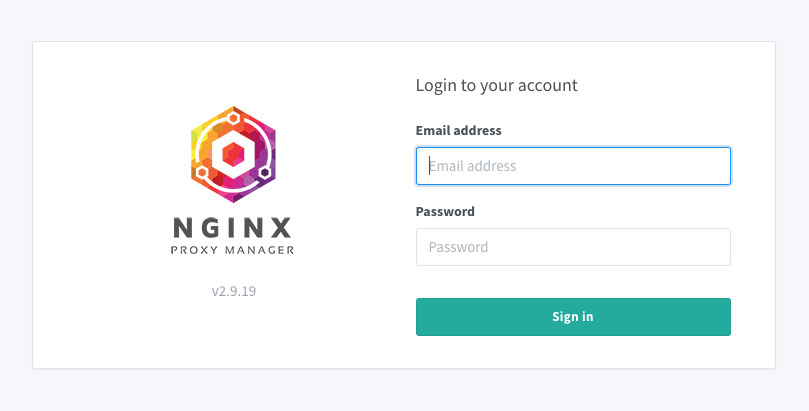
The default credentials are [email protected]:changeme. Once you log in, you will be prompted to change it.
Cloudflare Tunnel -> NPM Integration
Create a public hostname
This is probably one of the most exciting moments that we can quickly test for our integration with Cloudflare Tunnel and NPM.
Switch back to the dashboard where you created your tunnel and add a public hostname (you can find this under the Public Hostnames tab).
- Create a public hostname
- Subdomain:
npm - Select the domain which would be your domain/site that you’ve added to your Cloudflare account.
- Service:
- Type:
http - Url:
127.0.0.1:81(since Cloudflared and NPM are running on the same host, we can use localhost for this but if you have configured them to run on separate devices, use the IP address of your host).
- Type:
- Leave the rest of the options as is.
- Save hostname.
We have gone through all of these steps just to end up at this final stage! Browse to https://npm.<your-domain> and you should be presented with the same login page that we saw above.
It is pretty amazing that with a few steps, we were able to access our Nginx Proxy Manager dashboard from outside of our home network with TLS encryption.
Self-signed Certificate Applications
For any applications that are self-signed, follow the above steps but select the Service Type as https and the URL as the <IP>:<HTTPS PORT>. Under Additional Application Settings, expand the TLS tab and enable No TLS Verify. The rest of the options should be the same.
If you have an application that has a Lets Encrypt cert for example, it should be fine.
Wildcard Subdomain Routing
One of the cool things that I was able to get working was wildcard subdomain routing. What we will try to accomplish here is that for any subdomains that aren’t explicitly mentioned in the Tunnel’s Public Hostname tab, we will route through the NPM instance and then based on the hostname (including subdomain), NPM will proxy the requests to the hosts that we specify.
Some notes about this:
- I learned this the hard way but the free tier does not allow Universal TLS encryption for nested subdomains (i.e you can’t have foo.bar.< domain >). Only one tier of subdomains is allowed.
- You are able to control the order of the hostnames which I’m assuming is the resolution order so leave the wildcard routing at the bottom.
- This was a bit of a challenge and a problem I will tackle in the future but this wildcard routing that I configure will only work for non-TLS supported applications. For any TLS applications, create an explicit entry in the Public Hostnames page that routes to your server similar to how I mentioned above.
In the public hostname page, follow the same steps as mentioned earlier when we were creating the npm subdomain to create a wildcard subdomain entry. The only differences are that for the subdomain use * and the URL will stay as the IP for your NPM server and the port should now be 80 instead of 81. Port 81 is used for NPM administration whereas port 80 and 443 is where the proxying is enabled.
There is still one more crucial step for this to work. Head to the Overview tab for your tunnel and copy the tunnel ID. It should be a long alphanumeric string separated with dashes. Exit out of the Zero Trust dashboard and click on the DNS tab for your site/domain’s section.
Create a CNAME DNS record with * as the Name and the Content is <tunnel id>.cfargotunnel.com and leave the Proxy status as Proxied and not DNS only. We should be all set to enable wildcard routing through our NPM instance.
Create an NPM Proxy Host
If you followed this tutorial, you should have two subdomains in your Public Hostnames section for your Cloudflare tunnel. One is for npm and the other is for * (wildcard). Let’s delete the npm entry and actually enable this in our Nginx Proxy Manager dashboard as a Proxy Host. If this sounds confusing, I will document the steps and explain along the way.
First, head to the NPM admin panel through your local IP address and not through the npm subdomain since we just deleted it, and Add a Proxy Host.
For the settings,
- Domain names:
npm.<domain> - Scheme:
http - Forward Hostname/IP:
127.0.0.1 - Forward Port:
81 - Select Block Common Exploits
Leave the rest of the settings as is.
What we are saying here is that if the NPM receives a request for a host with the npm subdomain on port 80, proxy the request to the same NPM instance but on port 81. This process should work perfectly since we configured Cloudflare tunnels to route all wildcard requests to the NPM server on port 80. Now, we can perform the same request as before to https://npm.<domain> and be redirected to our NPM admin page.
Additional NPM Proxy Hosts
Portainer
To demonstrate this point further, let’s install Portainer as an application as well. Portainer is a Docker image that will provide an administrative panel to manage all of your Docker instances locally or connect to Portainer agents and manage those Docker instances as well. If you don’t have another server, feel free to install it locally on the same Docker instance as your NPM/Cloudflared server, but keep in mind that the IP addresses and details might differ slightly.
I saved the following Docker compose file as portainer-docker-compose.yml. Make changes as you see necessary.
version: "3"
services:
  portainer:
    image: portainer/portainer-ce:latest
    container_name: portainer
    restart: unless-stopped
    security_opt:
      - no-new-privileges:true
    volumes:
      - /etc/localtime:/etc/localtime:ro
      - /var/run/docker.sock:/var/run/docker.sock
      - /data/docker/portainer:/data
    ports:
      - 9000:9000
Run the following command:
conductor@docker:~$ docker compose -f portainer-docker-compose.yml up -d
Browse to http://<ip>:9000 and Portainer should prompt you to create an account. Once you create an account, select the local tab on the left, and you can view the containers running on this Docker instance. If you have more than just portainer running, you’ll see all of your containers.

Next, let’s create another NPM Proxy Host in the NPM dashboard with the following settings.
For the settings,
- Domain names:
portainer.<domain> - Scheme:
http - Forward Hostname/IP:
<IP> - Forward Port:
9000 - Select Block Common Exploits
Leave the rest of the settings as is. Now, if you browse to portainer.<domain>, you can finally access your application outside of your local environment!
VS Code Server
Even for fun, let’s download the VS Code Server Docker container which renders VS code in the browser!
Let’s copy the sample docker-compose file from https://hub.docker.com/r/linuxserver/code-server and modify the settings a bit.
version: "2.1"
services:
  code-server:
    image: lscr.io/linuxserver/code-server:latest
    container_name: code-server
    environment:
      - PUID=1000
      - PGID=1000
      - TZ=Etc/UTC
      - PASSWORD=<password>
      - SUDO_PASSWORD=<sudo password>
      - DEFAULT_WORKSPACE=/config/workspace
    volumes:
      - /data/docker/vscode/config:/config
    ports:
      - 8443:8443
    restart: unless-stopped
Same as before, I saved this as vs-code-docker-compose.yml and ran the docker compose command.
conductor@docker:~$ docker compose -f vs-code-docker-compose.yml up -d
Once the Docker container has finished, we should be able to view it by browsing to http://<IP>:8443 and entering our password that we specified in the PASSWORD environment variable in the docker compose file.
Next, the container should appear in portainer as well where we can manage any changes from there.
All that’s left is to add another proxy host to the NPM instance that routes the vscode subdomain to the VS Code Server on port 8443. The only addition when adding this proxy host is to Enable Websockets Support and that should be it.
It is pretty awesome that we were able to set this up with such little effort. Feel free to keep adding subdomains through the tunnel page or through NPM. For now, I will be adding proxy hosts in the NPM home page as long as they don’t have TLS enabled and then for any TLS applications, those will be explicit entries through the Tunnels dashboard.
NPM 404 Not Found
Since all of our requests that don’t match explicit subdomains from the tunnels specification are going through NPM, we should specify a 404 page. The default is that NPM will display a congratulations page.
Under the settings tab, edit the Default Site setting and create a Custom Page with the following HTML.
<html>
<head><title>404 Not Found</title></head>
<body>
<center><h1>404 Not Found</h1></center>
<hr></hr>
</body>
</html>
<!-- a padding to disable MSIE and Chrome friendly error page -->
<!-- a padding to disable MSIE and Chrome friendly error page -->
<!-- a padding to disable MSIE and Chrome friendly error page -->
<!-- a padding to disable MSIE and Chrome friendly error page -->
<!-- a padding to disable MSIE and Chrome friendly error page -->
<!-- a padding to disable MSIE and Chrome friendly error page -->
Now, if we browse to fake.<domain>, we should presented with just a 404 Not Found page with no details about what type of NGINX server it is. The default 404 page includes the version of NGINX and returns an HTTP status code of 404. I’m sure that Cloudflare has some safeguards against attacks but let’s keep our attackers on their toes.
Cloudflare Access
Lastly, Cloudflare Access has a versatile range of authentication methods that you can place in front of any of your applications. This can be configured with include policies, exclude policies, with a diverse number of methods to specify selectors such as emails, IP ranges, domains, etc. It is possible to apply this to a wildcard subdomain if you want to block absolutely everything but I will apply this per subdomain application since I might want to expose some for hosting my own blog, etc.
Google Identity Provider Integration
Follow the steps here 3 to enable Google authentication with Cloudflare Access.
Cloudflare Access Group
Once the above is configured, select Access Groups under the Access dropdown. I am going to create an Access Group to enable my personal emails using Google authentication.
- Specify a Group name.
- Check off Default Group
- For the Include policy
- Selector:
Emails - Value: You can include multiple emails, just press enter between each one.
- Selector:
- Save.
Couldflare Access Application
Let’s create our first Access Application. Head to Applications under the Access dropdown.
- Select Self-Hosted.
- Specify an Application name
- Update the Session Duration to what you’re comfortable with. This will invalidate after the amount of time and reprompt you for the Google authentication method.
- Specify the application subdomain (use a wildcard if you want to apply this to every application) and the domain
- Under Identity providers, I unchecked Accept all and selected Google. Click Next.
- Provide a policy name. Leave the rest of the options as default and proceed to the next page.
- Same here. Leave the rest of the options as default and Add application.
In an incognito browser, browse to one of the subdomains that match the application you created.
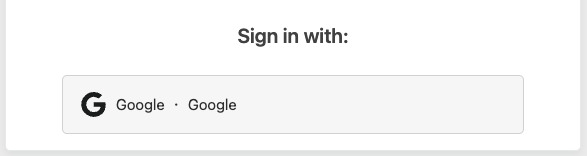
You’ll be presented with a Cloudflare access page and a button that will direct you to use Google’s authentication methods. If you use an email that doesn’t match the emails in the Access Group include policy you created, then you’ll be denied access.

If you successfully authenticate with a matching email, you will be allowed access! And there we have it. That wasn’t as complicated as we thought and it is pretty amazing how seamlessly everything works.
One thing to note is that once you’re authenticated through Google, this session will persist across multiple applications.
Conclusion
The Cloudflare Zero Trust service is impressive and I have only scratched the surface of what’s possible. It doesn’t support just HTTP and HTTPS applications, it can also render SSH, RDP, and support arbitrary TCP protocols. Lastly, it can even render SSH and VNC applications in the browser. In future posts, I will document those as well but I think we’ve covered enough here.